Light Dependent Resistors Gcse Circuit Diagram Circuit Diagram of LDR Sensor with Arduino The circuit diagram of the LDR sensor with Arduino is quite simple and straightforward, making it an excellent project for beginners in electronics. With just a few components, you can create a light sensing system that interacts with the Arduino board seamlessly. To set up the circuit, connect one leg of the LDR (Light Dependent Resistor) to the 5V Have you ever wanted to build a smart light that turns on automatically at night and off at day? In this hands-on tutorial, you'll learn how to control an LED using an LDR (Light Dependent Resistor) with Arduino. This project mimics real-world applications like streetlights, night lamps, or garden lighting systems that respond to ambient light. Learn how to use a Light Dependent Resistor with Arduino. This post will cover the basics of the LDR and how to use it to turn on a light when it's dark.

A light-dependent resistor circuit uses an LDR as a variable resistor to control current flow. By connecting an LDR in series or parallel with a fixed resistor and applying voltage, the voltage drop across the LDR changes with light intensity. Connect and program a light dependent resistor on the Arduino to measure light intensity for light responsive and daylight tracking projects.
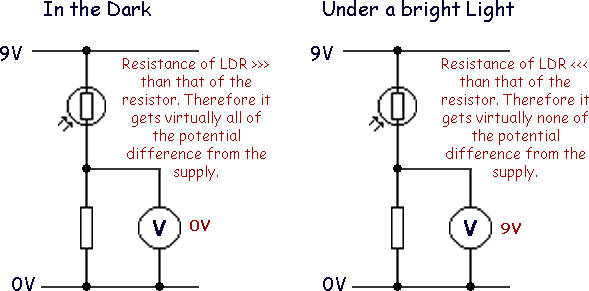
What is a Light Dependent Resistor and Its Applications Circuit Diagram
Learn how to use an LDR (Light Dependent Resistor), also known as a photoresistor. In this post we'll go over the basics of the Light Dependent Resistor and an example on how to use an LDR to turn on a light when it's dark. This article discusses bout what is a light dependent resistor (LDR), LDR circuit diagram with working principle and applications of LDR. This example demonstrates how to use an LDR (Light Dependent Resistor) darkness LDR, the LED is turned on/off.